↧
TCP Port Closed Powershell Check.apm-template
↧
THWACK Store Items & FAQ - Updated January 12th, 2018
Welcome to the pride and joy of the THWACK team - our community-based store! Here, you can spend your hard-earned THWACK points on some amazing items. We're very excited to be able to give back to all who've helped us along the way with feedback, contributions, and your work with the SolarWinds teams. Below are the items available for purchase, and a little information on how the process works.
- The THWACK Store can be found here, or by clicking the "SHOP" portion of the THWACK navigation, above.
- We have an amazing new and improved order process. Check it our here.
- Need more ways to earn points? Click here to find out how.
- Having issues with an order? You can contact us here at any time. We'll be sure to get back to you within 2-3 business days.
SolarWinds Stickers
Pack of 5 - 300 points

Geek Buttons
Pack of 5 - 300 points

SolarWinds Sunglasses
500 points

Foam Hat
500 points

USB Car Power Adapter
900 points

Window Basketball Hoop
1,500 points

THWACK Hammer
1,500 points

Koozie
1,500 points

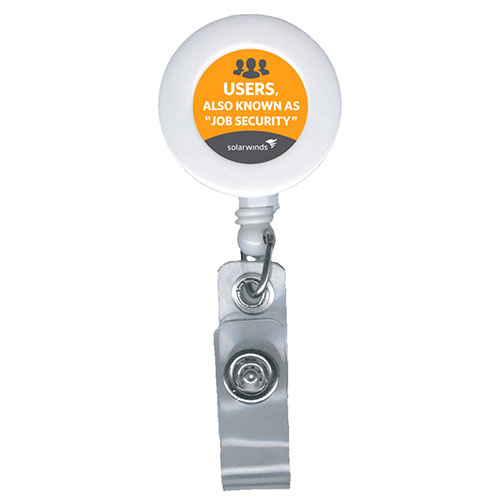
Retractable Badge Holder
Users. Also Known as "Job Security" - 2,000 points
Retractable Badge Holder
My Boss' Ego is Over-Provisioned - 2,000 points

SolarWinds Lanyard
3,000 points

THWACK Notebook
5,000 points

Laptop Sleeve
5,000 points

SolarWinds Geek Tee
5,000 points

SolarWinds Lab Tee
5,000 points

"Replace User and Try Again" Tee
5,000 points

Threat Hunter Tee
Guardians of Scurity - 6,000 points

"Rage Against the Virtual Machine" Tee
6,000 points

SolarWinds Lab Flask
25 oz - 6,000 points

AstroGeek Tee
7,000 points

SolarWinds Polo
8,000 points

SolarWinds USB Drive
8 GB - 8,000 points

Laptop Skin
SolarWinds Buttons - 8,000 points

SolarWinds Socks
Gray with Orange Flares - 10,000 points

SolarWinds Socks
White with Orange Stripes - 10,000 points

SolarWinds Socks
Gray and Orange Argyle - 10,000 points

SolarWinds Raincoat
12,000 points

Men's Zip-Up Jacket
12,000 points

Women's Zip-Up Jacket
12,000 points

SolarWinds Socks
Choarcoal and Blue - 12,000 points

SolarWinds Socks
Multi-Colored Triangles - 12,000 points

SolarWinds Socks
Blue with Orange Flares - 12,000 points

THWACK Messenger Bag
15,000 points

THWACK Hammock
15,000 points
THWACK Bluetooth Speaker
18,000 points

THWACK Backpack
25,000 points

THWACK Fridge
Holds a full six-pack - 80,000 points

Custom THWACK Cornhole Set
Includes Sandbags - 100,000 points

SolarWinds Beats Headphones
Bluetooth Wireless - 125,000 points

Frequently Asked Questions
Will I lose my spot on the leaderboard or my badges if I purchase an item from the store?
No, you will not lose your spot on the leaderboard nor your badges. However, the store will deduct these points from your available balance. For example, if you have 5,000 points and you purchase a laptop sleeve for 2,000 points, your point value will reflect 3,000 but your spot on the leaderboard will not change. In other words, the leaderboard runs off of your lifetime balance and all of your earned badges will stay in your profile.
Is the shipping cost covered?
Yes. There will be no cost to you.
What countries do you ship to?
United States, Canada, United Kingdom, and Germany are currently the only countries we ship to.
My points were deducted, but I don't live in any of the eligible countries for shipping. How can I get my points back?
Please email thwackstore@solarwinds.com for assistance.
How soon will I receive my item?
After your order has been processed and shipped, you should receive your item within 7-10 business days. If an item is on backorder, you may not be notified automatically. You will receive your item, but it may take up to 30 days to restock the item.
How do I purchase an item from the store?
You will begin the purchasing process in a similar way, but will soon see the changes. You'll be presented with a list of products you're able to purchase. After clicking the purchase button, the item card rotates and presents a "confirm" button.


After clicking Confirm, you will be presented with a shopping cart dialog. Here, you can review the items in the cart, checkout, or keep shopping. A recent feature includes the ability to remove the item from the cart.

A new icon in the header will show you the current number of items in your cart. Clicking this icon will also bring up the shopping cart dialog. No longer will you lose your order if you have to step away!
Clicking the Checkout Now button will transition the dialog to a form that allows you to fill in a new address. Selecting the "Save this information to my user profile" checkbox will make sure your address is pre-populated for any future orders. You'll still be asked to verify your address before shiping.
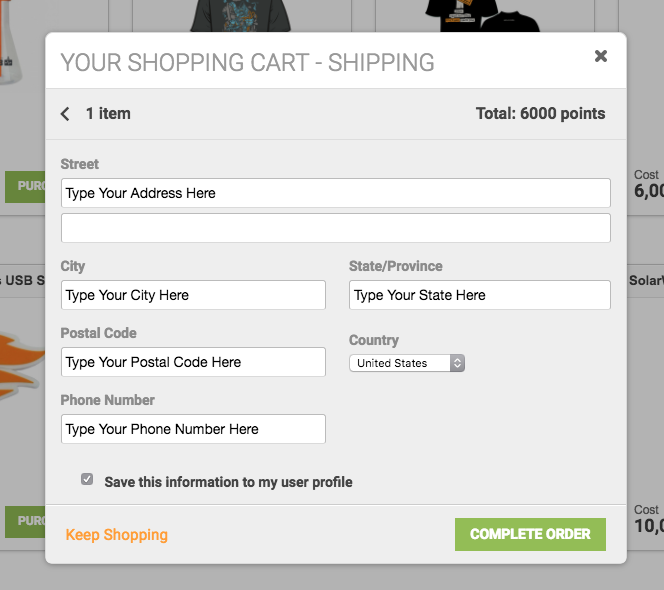
Once finished, you click on the Complete Order button.
After clicking the Complete Order button, you will then be presented with an Order Complete dialog, explaining what happens next.

Until an order has been confirmed Received by our fulfillment vendor, you will see an order status icon in the header bar next to your login name. The number next to the icon indicates the number of open orders.
Clicking this icon will present an Order Status dialog that shows the fulfillment stage the order is in, along with a link to track the package it has already been shipped. You'll also note orders can be in three major stages: Order Submitted, Order Processing, and Order Shipping

Questions? Feel free to post a comment below.
↧
↧
List all devices connected to your network with switch port mapping
If you only have NPM and NCM but do not have User Device Tracker (UDP) and IP Address Manager (IPAM) you can still list all (almost) devices connected to your network from NCM ARP Table by using SWQL. Just following the steps bellow:
- Create a new view
- Add two resources: “Custom Query” and “Custom HTML”
- In “Custom Query”, paste attachments ” All-devices-on-network.txt”
and “All-devices-on-network-with-search.txt” - In “Custom HTML”, paste attachment “HTML-search-help-text.txt”
Done.

To make sure relative data collected correctly please note:
- Node Details – List Resources – Topology: Layer 3 is ticket

- NCM settings – Node Inventory – Standard: the following are ticked


Thanks
↧
It's Not Paranoia, You Really Are Being Watched - 1

There are plenty of other features / applications/ and modules in SolarWinds besides just Kiwi that make it difficult to be a silent admin hoping that "Red Tape" changes will go unnoticed, but is just one those things to consider as a network admin to avoid getting egg on your face.
It's the middle of the day, you have tickets you want to complete, but your company says no network changes are allowed during the day. You (possibly a new network admin) think, eh it's just this little change, who is going to even notice? You proceed with your change. Minutes later your boss is behind you wanting to have, "..a talk". Oh crap, she knows....how does she know??? They're watching. They're always watching....well not them personally, but likely the SolarWinds Kiwi Syslog Server that is specifically bread to collect and even email a person or distribution list of people on this type of activity (if the network gear was configured to send over the data of course) . Don't let this happen to you! Happy Admining everyone
↧
Solarwinds NetPerfMon Website IIS Error Code Reference Guide
PURPOSE: This is intended to be an extended guide for IIS Errors pertaining to Authentication and access. This is to clean up the Smart Card Guide (to simplify both in the end), and to incorporate General Orion Web Console IIS Errors.
This is a Work in Progress (WIP) and is being updated.
IIS Log Files: Enabling additional logging, then monitoring the IIS connection will help to determine if IIS is causing the issue.
In IIS manager> go under the local Server> Sites> Solarwinds NetPerfMon> Logging
Directory will show the location, you will usually see it under C:\inetpub\logs\LogFiles\W3SVC2 or W3SVC1 if Default is deleted.
IIS Common Web Return Codes
The Focus of this guide is over the 300, 400, 500 series codes
Code Series - Meaning
- 100s - Informational
- 200s - Success
- 300s - Redirection
- 400s - Client Error
- 500s - Server Error
403 Subcode
User Permission Access Issue:
- 403.1 - Execute access forbidden
- 403.2 - Read access forbidden
- 403.3 - Write access forbidden
If the user sees the above Error(s), Group Policy has blocked the user from accessing the System. IIS leverages the same Authenticate access as if a user was logging into the system.
- Open up Group Policy Manager, whether on the System Directly or through Group Policy Editor
- Go into Computer Configuration\Policies\Windows Settings\Security Settings\Local Policies\Security Options\
- Check Security Settings to ensure that accounts are not denied Login Access. IIS uses multiple Group Policy Settings to determine access. If the user does not fall into these groups, the user will be blocked access.
- On the Solarwinds Server, Check the Security Event Log on the Solarwinds Server and the Event ID.
- Use this Microsoft Page to identify what setting is causing the issue based on the Event ID or Message. Interactive Logon Tools and Settings: Logon and Authentication
User connected via http://, change to https://
- 403.4 - SSL required
SSL Setting is set to Required see Setup SSL and Enable Smart Card (CAC/PKI) User Authentication for Orion 2017.1+
- 403.7 - Client certificate required. This error message is received if a client does not provide a client certificate when one is required. Either the client refused to send a client certificate or the client did not have a certificate issued by a mutually trusted certification authority.
- 403.13 - Client certificate revoked. This error message means that the client sent a certificate, but either the certificate shows up as revoked in the issuing authority's Certificate Revocation List or the server could not retrieve a CRL from the issuing authority.
- 403.16 - Client certificate is untrusted or invalid. Primarily generated when client certificate provided is improperly formed. It can also occur if the Intermediate Certification Authorities in the certificate chain is not trusted by the Web server.
- 403.17 - Client certificate has expired or is not yet valid. The current date on the server is not within the valid date ranges that are presented in the client certificate.
Sometimes 403.7 accompanies 500:
- 500 0 64 & 403 7 5
Directory List denied (should not be needed)
- 403.14 - Directory listing denied. Error w
↧
↧
Setup SSL and Enable Smart Card (CAC/PKI) User Authentication for Orion 2017.1+
Author’s Note: This is for Orion Core 2017.1 and higher. For older versions, please go here.
PURPOSE: Orion uses Self Signed SSL by default. This guide is to walk-through setup to use a Domain Certificate through a Root CA. This guide covers setup, as well as troubleshooting and options for Smart Card Authentication Setup and Login.
PREREQUISITES:
- Designed For Windows Server 2012 R2 - 2016.
- Solarwinds Server must be on the same domain the Users are authenticating.
- Enable TLS in Orion Platform products - SolarWinds Worldwide, LLC. Help and Support
Please make sure that you have the following setup prior to this document.
- Add at least 1 Active Directory account to the Web Console before attempting. Once SSL Setting is changed to Required, the Orion accounts like Admin account will not be able to login.
- Possible Error when setting up accounts:
Recommended to enable TLS 1.2 prior to enabling SSL. Same registry setting should be used on the SQL Server in addition to the Solarwinds Server if SSL connection is used.
Note: Restart is required after registry change.
- Enable TLS in Orion Platform products - SolarWinds Worldwide, LLC. Help and Support
- Desktop tools like Trap Viewer, Syslog Viewer, Account Limitation Builder do not work if TLS 1.0 is disabled - SolarWind…
Browsers Tested:
- Internet Explorer (Please use for testing/verification)
- Mozilla Firefox
- Google Chrome
- Opera, Vivaldi.
PHASE 1: Create Certificate
Create the certificate
IIS SHA1 certificate creation.
Please create a certificate
Go into IIS:
- Go into Start> Control Panel> Administrative Tools> Internet Information Services (IIS) Manager
- Select the Server
- Select Server Certificates
Create a Domain Certificate (if you have a valid CA in the Domain, use this option)
- On the Right under Actions, Select Create Domain Certificate.
- Enter Common Name
- This should be the hostname, fully qualified domain name, or name that will become a DNS CNAME that the users will connect.
- A short name is possible, if you have a CNAME record in the DNS Server to resolve the short name to the Solarwinds Server.
- The Common Name is required to match the name of the Web URL for all functions to work and for the site to be considered safe and trusted.
- Fill in Organization, Organizational Unit, City, State and Country. This just needs information filled in, does not need to be factually correct.
- Select Next
- Select the Select button and select the Certificate Authority.
- If you do not see anything to select, please create a Self-Signed Certificate.
- Enter a Friendly Name
- This name will be accessed under Set Web Server Certificate’s Step 8 and every-time you run the Configuration Wizard on Website.
Microsoft Management Console method (SHA256 Support)
Note: If you want to setup for SHA256, Please use other online guides for setup of Certificate Authority Certificate template for IIS in sha 256.
Quick Run down:
- Run as a User with Certificate Creation abilities, Run Command Prompt as another User and login, enter MMC
- In the Microsoft Management Console, Select File> Add/Remove Snap-In, Double click Certificates, Computer Account, select Local Computer, Finish.
- Click Certificates> Local Computer> Personal> Certificates.
- Right Click in the white space on the Right, select All Tasks> Request New Certificate.
- Select Next> Active Directory Enrollment Policy, Next
- Expand the Web Server Template (or custom Template with Application policies: Server Authentication) Select Properties.
- Enter a Friendly Name
- Go into Personal> Request a new Personal Certificate.
- Select the Certificate Template you created to create a new certificate.
- Once it is created, you will now be able to select it as a Certificate in IIS and follow below.
PHASE 2: Setup IIS
You have 2 options, use IIS or the Configuration Wizard. If you do not need to run the Configuration Wizard, skip to use the IIS method instead.
A: Set Web Server Certificate using Configuration Wizard
This is preferred if you setup the certificate prior to the Running the Configuration Wizard.
- Select Enable HTTPS
- Select the Certificate Name of the Server, make sure you see the check-mark.
- Let the wizard run
B: Set Web Server Certificate using IIS
Note: After having completed the Domain Certificate Steps
- In IIS, expand out the Server and Sites.
- Select Solarwinds NetPerfMon
- Right Click and select Edit Bindings
- Select Add
- Change Type to https (you can remove http)
- IP Address should be set to All Unassigned
- Port 443
- Note: You may be required to enter the Fully Qualified name into the Host Name field. This is due to GPO requirement set.
- Note: Do not select Require Server Name Identification, it can block login. Do not change unless known its required to be set, instructed, or exhausted all other causes to login failure.
- SSL Certificate select the certificate Friendly Name
Secure the Site for Authentication Access
- Expand the Sites folder to SolarWindsNetPerfMon.
- Under IIS, select Authentication.
- Disable Anonymous Authentication.
- When a user goes to the site, and the card is prompted. When Disabled & SSL set to Require, if user attempts to login, they see the smart card popup and hit cancel, the page fails with 403 Forbidden. If you want to have the login screen as a fallback, keep enabled.
- Disable Forms Authentication.Note: If your environment requires forms authentication, attempt these configuration changes with forms authentication enabled.
- Enable Windows Authentication.
- Click the back button on the top of the screen to return to the SolarWindsNetPerfMon Home view.
- The next setting is where Smart Card is Enabled/Disabled.
- Click SSL or SSL Settings.
- Click Require SSL.
- Apply at the top Right.
- Client Certificate option explanation:
- Ignore: (Not Recommended) I do not have smart Card or a certificate to the user setup at the moment.
- Accept: (Recommended If User Login Fails) Change this setting to Accept for testing of Smart Card access functionality. Test User both on a workstation, and on the server Locally (Dameware MRC and Microsoft RDP both support sending the Smart Card data to the remote System). It needs to be on Required for full functionality.
- Required (Recommended Setting)
- Client Certificate option explanation:
Testing to make sure it all works.
- Navigate to the Orion SSL website. Use https://<SSLCertificateFriendlyName>/
- You will see a Certificate Popup (based on SSL Settings), select the User Certificate.
- It should then prompt for Card & PIN
- If you encounter any Errors here, see Below.
- You are now in the Web Console as the User selected.
- You should now be at the Summary Screen.
- If a certificate error is showing up, or you see a Red X, the name of the certificate does not match the url entered. Click on the Certificate and the "Issued To:" will tell you the URL to use.
- If the Certificate shows as a Lock in the browser, you are good to go.
Troubleshooting:
Default Alert & Report URL Change
Note: Technically Optional: SQL Server database change to reflect SSL enabled and new URL
Note: Only for when the URL is not the fully qualified name of the Server.You may see the following errors when selecting a URL link
Error Reported: NET::ERR_CERT_COMMON_NAME_INVALID or Your connection is not private
- The issue is that the URL link goes to the Hostname, not the FQDN Name the Certificate Uses. This section re-mediates this problem.
- Log on to your Orion server.
- Click Start > All Programs > SolarWinds Orion > Advanced Features > Database Manager. (elevated privileges are required to access this application)
- Click Add Default Server.
- Expand your Orion database in the left pane. Default Database names will be SolarwindsOrion or NetPerfMon.
- Right-click the Websites table, and then click Query Table.
- Select Execute.
- Next you are going to reference back to the SSL Certificate Friendly Name, this name will go into the <ServerName> Field.
- If you do not know, do not update this column.
- Replace the default query with the following query:UPDATE Websites SET FQDN='', ServerName='', Port='443', SSLEnabled=1 WHERE Type='primary'
- Click Execute Query.
- Right click on the Websites Table again and select Query Table, and Select Execute query.
- Make sure that the Server Name appears as correct, and a Port is set and if SSL is to be required that it is set to 1.
- Make sure to Restart the Service Solarwinds Information Service v3 so that the Alerting and Reporting System will utilize this new URL for all actions. The Orion Web Link in the start menu will be updated at this same time.
- Click Start > All Programs > SolarWinds Orion > Advanced Features > Orion Service Manager.
- Select Solarwinds Information Service v3, and select Restart or Stop then Start.
- You can verify by selecting the Orion Web Console link under Start.
- Internet Explorer: Red X, There is a problem with this website’s security certificate.
- Google Chrome: Your Connection is not private message
- Firefox: Untrusted Connection or Your Connection is Untrusted
- If the SSL Certificate shows as invalid or has a Red X, Export to PDF and Reports may not function correctly. Friendly Name needs to match URL.
If you only see a white screen after these steps, you may have missed some steps. Please refer back to Require SSL and change it back to Ignore. The Web Console will load as before.
Issues with User authentication accessing the login site:
When Troubleshooting, it is best to use Internet Explorer. IE gets all CA information from the Domain, it usually is set to automatically authenticate with the logged in user. This covers User Authentication issues and nuances based on the various settings available.
Note: This is a ever growing area, as you stray away from the default configuration, these nuance issues have been identified as different settings were changed and tested.
User Logs in, cancel at the Certificate popup or select certificate and cancel before PIN authentication
- Somehow the user is logged in under the AD login to the web console:
Change SSL Setting is currently accept, change to Require.
- Web Console is showing as a blank screen.
- Go to the Check Internet Explorer Browser settings. Skip Steps 2-5. User authentication is incorrectly set to Anonymous or Prompt for Username & Password.
- I get a popup for AD authentication, or I go to the Login screen and see the Login page but with the Solarwinds Logo as an X.
- Currently Login is set as Automatic Login only in Intranet Zone. Change to Automatic Login with Current User Name and Password.
User cannot select the certificate popup? Which Browser is used to login?
Internet Explorer works always, chrome yes. Check your browser to see if it has its own CertificateAuthoritative area outside of the OS. Firefox does this.
I attempt to login like the instructions stated, why am I not authenticating through?
So this is where you need to make sure that IIS is not denying you, AND the OS or Group Policy is not blocking the account authentication.User is Required Interactive Logon for this system. Please see Solarwinds NetPerfMon Website IIS Error Code Reference Guide
After I enter my PIN, I get prompted for my account Login for Username Password.
Windows Account Automatic Logon is not Enabled
Go into Settings> Web Console Settings>Windows Account Login set to Enable Automatic Login; SelectSubmit at the bottom.
Or under Configuration Wizard> Website also includes the automatic logon option
General Browser Troubleshooting
When Diagnosing more general user issues, please follow this guide to help to ensure that the site is tied to the correct security, and that the system is being authenticated properly
Google Chrome/Opera/Vivaldi:Follow Internet Explorer browser instructions:
Microsoft Internet Explorer:
- Select the Alt Key to bring up the Menu (IE 10 and newer), then select File> Properties
- Look for Zone of the Solarwinds Site to know what the user is using under Security Zone, this is needed for Step 5
- Select the Gear or Settings> Internet Options
- Select the Security Tab
- Select the Zone that was seen in Step 2 and select Custom Level.
- You can promote the site to Trusted for better security
- Select Trusted Sites
- Select Sites
- Select Add
- Enter in the URL, or *.Domain
- Select Close
- You can promote the site to Trusted for better security
- Scroll to the bottom, last option is User Authentication.
- If the User only has 1 certificate and wants it auto-selected. This will login the account that they are logged on the OS with.
- Select Automatic Logon with current user name and password
- If the User wants to select and have a choice for certificates.
- Select Prompt for User name and Password
- If the User only has 1 certificate and wants it auto-selected. This will login the account that they are logged on the OS with.
- Refresh or restart browser. You may need to clear cache for the change to take effect.
Mozilla Firefox:
- In the Firefox address bar, enter about:config.
- A warning will show up, select accept
- In the Filter field, enter security.enterprise_roots.enabled
- Firefox versions before 49 will use the setting: network.automatic-ntlm-auth.trusted-uris. In the Enter string value window, enter comma-separated list of the URLs of the Orion Web Consoles to which you want to enable AD access, as shown in the following: https://OrionServer1,http://OrionServer2
- Double-click the Preference Name listed security.enterprise_roots.enabled, it should change from False to True
- Click OK.
- Note: You can just refresh the page, and authentication will occur as normal, no restart was required
↧
Custom Metric - TempDB Free Space Percent
Description
This custom metric will collec the current free space for TempDB as a percentage.
Metric Definition
To create the custom metric, click on Options > Custom Resource Metrics and configure the metric similar to this:
Database Versions:<no limitations>
Display Name: TempDB Free Space (%)
Description:<add your own description>
Category:<add to whatevfer category you like or create a new one>
Units: % (also check the "Chart as Percent" box)
Metric Type: Single Value
Frequency: 600
Timeout: 50
SQL Statement:
IF OBJECT_ID('tempdb..#t', 'U') IS NOT NULL
DROP TABLE #t
CREATE TABLE #t (FileID int, FileGroup int, TotalExtents bigint, UsedExtents bigint, dbname sysname, FileName sysname)
use tempdb
insert into #t exec('DBCC showfilestats')
select 100.0 - (100.0*SUM(UsedExtents*64.0) / SUM(TotalExtents*64.0)) from #t
DROP TABLE #t
↧
Filters - Making or Breaking the Work Life Balance
Configuring Filters- Making or Breaking the Work life Balance
Filters cut out all the messages that admins would rather not see on the display and stops email alarms from getting out of hand, when configured properly.
Per Kiwi Documentation, when No filters are applied, all messages are passed.
When this happens, especially on a large enterprise network, it gets ugly fast.
While it may seem useful to hear about every single event, every single spike, every single 1 second blip in service, it's just not.
What ends up happening is the people receiving the emails become numb to the shock value of seeing something happen and start to ignore the emails over time.
Getting an email that something an event has happened (for a good engineer) triggers an immediate need to handle the issue.
When the email notifications being sent are not actually actionable items that the engineers can trouble shoot and resolve, the alerts become pointless and the entire point of depending on the NMS system for useful information crumbles. Yes, that engineer especially if they're new, will go and spend on average of 20 minutes considering each email alert to see if there's a real issue to address.
Harvard Business wrote a piece on this which backs up the theory as well. In the article (there are many articles on this subject not just from Harvard Business) it states:
"For one thing, productive time is lost as employees deal with information of limited value. In the case of e-mail, effective spam filters have reduced this problem. Still, a survey of 2,300 Intel employees revealed that people judge nearly one-third of the messages they receive to be unnecessary. Given that those same employees spend about two hours a day processing e-mail (employees surveyed received an average of 350 messages a week, executives up to 300 a day), a serious amount of time is clearly being wasted."
From https://hbr.org/2009/09/death-by-information-overload
This isn't even considering the types of emails that Network Engineers get from SolarWinds and Kiwi or after hours’ emails. Please consider the latest studies on the effectiveness of filtering emails for the sanity of all who receive them.
If you're not sure what kinds of filters to set up, begin by looking at your most annoying emails, logs events, syslog, or trap events start with those. =o)
You can start simple:

You can go complex:

Inclusion and Exclusion Filter
When engineers want to get fancy, they use an Inclusion AND Exclusion Complex filter. It's just as easy to use, but sometimes just need to say the filter out loud to really see if it will make sense. Always test the function when all fields are filled in and upon successful execution, Save the settings.

If an engineer wants to get SUPER fancy, there is also a RegEx, "Filter Type". More on Regex can be found in Kiwi Documentation here under Configuring the Syslog Properties > Rules/Filters/Actions > Filter Types > Regular Expression Filter. http://www.kiwisyslog.com/help/syslog/index.html?gettingstartedwithkiwisysl.htm
I'm not yet a RegEx expert but I'm sure we have some in the community =o).
Other ways to Find Matches can be selected as well.

↧
SAM Template Polling Frequency Report
↧
↧
JNPR-JNOS-IRTR - Account Access
↧
DISA STIG Master List (A-Z)
Thank you for choosing this document.
You may want to create two different custom properties to help sort which reports will hit the different devices.
Name the first column "C1_DeviceType" and include the following drop-down selections:
L2SW - Layer 2 Switches
IL3S - Infrastructure Layer 3 Switches
IRTR - Infrastructure Routers
PL3S - Perimeter Layer 3 Switches
PRTR - Perimeter Routers
XE - IOS-XE Routers
ASA - ASA Firewalls
F5 - F5 Load Balancers
FW - Firewall SRG Devices
IPSEC - IPSEC VPN Devices
SRX - Juniper SRX Devices
IDPS - Intrusion Detection and Prevention Systems
Name the second custom property "C2_OS" and include the following drop-down selections:
OSXE - To support IOS and IOS-XE devices
NXOS - To support Nexus OS
ASA - To support ASA OS
IOSXE - To support IOS-XE Routers
F5 - To support F5 Big IP Load Balancers
FW - To support Firewall SRG devices
VPN - To support VPN specific STIGs
SRG - To support SRG Type Documentation
SRX - To support SRX Device Management
This file was uploaded from the "Shared on Thwack" Tab via NCM Compliance tree.
Thanks and stay tuned........
Cisco IOS XE Release 3 NDM STIG - Ver 1, Rel 3
STIG-CSCO-IOSXE-NDM - User Access.xml
STIG-CSCO-IOSXE-NDM - SNMP SSH and VTY.xml
STIG-CSCO-IOSXE-NDM - Services.xml
STIG-CSCO-IOSXE-NDM - Logging Part 1.xml
STIG-CSCO-IOSXE-NDM - Account Access.xml
Cisco IOS XE Release 3 RTR STIG- Version 1 Release 2
STIG-CSCO-IOSXE-RTR - Service.xml
STIG-CSCO-IOSXE-RTR - Routing Protocol.xml
STIG-CSCO-IOSXE-RTR - Multicast and IPv6.xml
Draft Router SRG Ver 3
Router Security Requirements Guide 01.xml
Router Security Requirements Guide 02.xml
Router Security Requirements Guide 03.xml
Router Security Requirements Guide 04.xml
Router Security Requirements Guide 05.xml
Router Security Requirements Guide 06.xml
F5 BIG-IP Access Policy Manager (APM) 11.x STIG- Ver 1, Rel 1
F5 BIG-IP Advanced Firewall Manager (AFM) 11.x STIG - Ver 1, Rel 1
F5 BIG-IP Application Security Manager (ASM) 11.x STIG - Ver 1, Rel 1
F5 Big-IP Device Management 11.x STIG - Ver 1, Rel 5
F5 BIG-IP Local Traffic Manager (LTM) 11.x STIG - Ver 1, Rel 2
Firewall Security Requirements Guide - DRAFT- Version: 1 - Rel: 0.1 01 Jan 7999
IPSec VPN Gateway Security Technical Implementation Guide Version: 1: Release: 14: 26 Jan 2018
Layer 2 Switch Security Requirements Guide Version: 1: Release: 1: 27 Jun 2016
SRG-Layer 2 Switch - Section 1
SRG-Layer 2 Switch - Section 2
SRG-Layer 2 Switch - Section 3
Juniper SRX SG VPN Security Technical Implementation Guide Version: 1: Release: 2: 27 Oct 2017
Juniper-SRX-SG-VPN - Section 1
Juniper-SRX-SG-VPN - Section 2
Juniper-SRX-SG-VPN - Section 3
Juniper SRX SG NDM Security Technical Implementation Guide Version: 1: Release: 2: 27 Jan 2017
Juniper-SRX-SG-NDM - User Access
Juniper-SRX-SG-NDM - Logging 2
Juniper-SRX-SG-NDM - Logging 1
Juniper SRX SG IDPS Security Technical Implementation Guide Version: 1: Release: 2: 28 Jul 2017
Juniper-SRX-SG-IDPS - Section 1
Juniper-SRX-SG-IDPS - Section 2
Juniper-SRX-SG-IDPS - Section 3
Juniper SRX Services Gateway (SG) Application Layer Gateway (ALG) STIG, Version 1
Perimeter Router - Cisco Security Technical Implementation Guide Version: 8: Release: 27: 27 Oct 2017
CSCO-OSXE-PRTR - Account Access
CSCO-OSXE-PRTR - VTY and Console
CSCO-OSXE-PRTR - Routing Protocol
CSCO-OSXE-PRTR - Logging and NTP
CSCO-OSXE-PRTR - IPv6 and Multicast
CSCO-OSXE-PRTR - External Interface
Perimeter L3 Switch - Cisco Security Technical Implementation Guide Version: 8: Release: 27: 27 Oct 2017
CSCO-OSXE-PL3S - VTY and Console
CSCO-OSXE-PL3S - Switch Interface
CSCO-OSXE-PL3S - Router Interface
CSCO-OSXE-PL3S - Logging and NTP
CSCO-OSXE-PL3S - IPv6 and Multicast
CSCO-OSXE-PL3S - Bidirectional ACL
CSCO-OSXE-PL3S - Account Access
Layer 2 Switch Security Technical Implementation Guide - Cisco Version: 8: Release: 23: 26 Jan 2018
CSCO-OSXE-L2SW - Switch Interface
CSCO-OSXE-L2SW - Logging and NTP
CSCO-OSXE-L2SW - Account Access
CSCO-OSXE-L2SW - VTY and Console
Infrastructure Router Secure Technical Implementation Guide - Cisco Version: 8: Release: 25: 26 Jan 2018
CSCO-OSXE-IRTR - VTY and Console
CSCO-OSXE-IRTR - Routing Protocol
CSCO-OSXE-IRTR - Logging and NTP
CSCO-OSXE-IRTR - IPv6 and Multicast
CSCO-OSXE-IRTR - Account Access
Infrastructure L3 Switch Secure Technical Implementation Guide - Cisco Version: 8: Release: 25: 26 Jan 2018
CSCO-OSXE-IL3S - VTY and Console
CSCO-OSXE-IL3S - Switch Interface
CSCO-OSXE-IL3S - Routing Protocol
CSCO-OSXE-IL3S - Account Access
CSCO-OSXE-IL3S - Logging and NTP
CSCO-OSXE-IL3S - IPv6 and Multicast
Perimeter Router Security Technical Implementation Guide Juniper Version: 8: Release: 28 26 Jan 2018
JNPR-JNOS-PRTR - VTY and Console
JNPR-JNOS-PRTR - Routing Protocol
JNPR-JNOS-PRTR - Router Interface
JNPR-JNOS-PRTR - IPv6 and Multicast
JNPR-JNOS-PRTR - Access Account
JNPR-JNOS-PRTR - Logging and NTP
Infrastructure Router Security Technical Implementation Guide Juniper Version: 8: Release: 25: 26 Jan 2018
JNPR-JNOS-IRTR - VTY and Console
JNPR-JNOS-IRTR - Routing Protocol
JNPR-JNOS-IRTR - Logging and NTP
JNPR-JNOS-IRTR - IPv6 and Multicast
JNPR-JNOS-IRTR - Account Access
Network Device Management SRG - Ver 2, Rel 12 10/27/2017
Network Firewall STIG - Ver 8, Rel 24 10/27/2017
Network Infrastructure Overview - Version 8, Release 8 1/23/2015
Network Infrastructure Policy STIG - Ver 9, Rel 4 10/27/2017
Network Infrastructure Router L3 Switch STIG - Ver 8, Rel 24 10/27/2017
Network L2 Switch STIG - Ver 8, Rel 22 10/27/2017
Network Management Security Guidance At-a-Glance 9/7/2017
Network Management Whitepaper 3/24/2010
Network Other Devices STIG - Ver 8, Rel 20 10/28/2016
Network Perimeter Router L3 Switch STIG - Ver 8, Rel 27 10/27/2017
Network WLAN STIG - Ver 6, Rel 12 10/28/2016
Network WMAN STIG - Ver 6, Rel 11 10/28/2016
Palo Alto Networks Application Layer Gateway (ALG) STIG - Ver 1, Rel 3 7/28/2017
Palo Alto Networks Intrusion Detection and Prevention System (IDPS) STIG, Version 1 12/1/2015
Palo Alto Networks Network Device Management (NDM) STIG - Ver 1, Rel 3 7/28/2017
Palo Alto Networks STIG Overview, Version 1 12/1/2015
↧
What Are We Working on for DameWare - Updated November 27th, 2017
To receive updates on the DameWare roadmap, JOIN thwack and BOOKMARK this page.
We are currently in the planning phase for the next release, we are investigating following areas. As we move forward we will update this post to reflect what we are working on short-term. If there is anything missing or arguments to move things up, vote on product ideas or post a comment.
We're now focusing on these enhancements:
- fixing Low refreshrate on Windows 10 ver.1709
- Adding support for TLS 1.2
- Adding support for SMBv3
↧
What We're Working On - Log & Event Manager Edition (Updated February 22nd, 2018)
(Updated February 22nd, 2018)
Now that we’ve gotten LEM 6.3 out the door, I’m excited to announce that we are working on the following:
- Basic HTML5 Events Console – The first big step in moving away from Flash and to HTML5. Although it will be a long road to get completely away from Flash, we are working on that first step.
- Update Debian – The great advantage of a secured, hardened virtual appliance is you, the user, don’t need to worry about the underlying OS. However, we spend a great amount of time making sure Debian and required packages are up to date and there are no known vulnerabilities.
- Allow disk growth beyond 2 TB
- LEM SQL Auditor support for SQL Server 2016
Although this might seem like a short list, there is a tremendous amount of work required to make progress on delivering functionality in HTML5. We think you’ll be happy with the direction we are going. We are actively looking for existing customers to give feedback. If you are interested, we’d love to hear from you!
Be sure to let us know here, and in the Log & Event Manager Feature Requests forum, if there are features you're really keen on. This list doesn't enumerate a lot of the features we're looking into for long term development and further releases, but we continually use Thwack as our biggest source of feedback.
↧
↧
File Share Tools template
↧
What We Are Working On for NCM after v7.7 (Updated on September 19, 2017)
With the release of NCM v7.7 completed, we have started working on another great set of features.
Network Insight for Cisco Nexus
- ACL management for Nexus (building on Cisco ASA support introduced in NCM v7.7)
- Device Inventory support for Nexus devices including associated modules
- Nexus Firmware CVE reporting
- Firmware upgrade for Nexus including support for ISSU
- Additional device and config change templates for Nexus devices
- Other Nexus-specific capabilities including Virtual Device Context, Virtual Port Channel discovery and management
Various Improvements
- Deeper NPM integration - for example Interface Configuration Snippets - be able to see interface configuration in context on Interface Details page
- New, consistent regex implementation - support standard .NET framework syntax.
- Centralized Upgrades including new Scalability Engines installer
- Next Generation Orion Mapping
- Updated reports for PCI DSS 3.2.
↧
What We're Working on for NPM (Updated December 4th, 2017)
NPM 12.2 has shipped and we're hard at work building the next release. Here's what we're working on, in no particularly order.
- Network Insight for Cisco Nexus - Covering things like FEX, VPCs, VDCs, and better handling of large interface counts.
- Scalability Improvements - For example, increasing total element count per instance and adjusting UI workflows to work better in scale environments.
- Remote Collector - New, agent based collector for distributed environments and hybrid deployments
- Orion on RDS - Support for Amazon RDS as the repository for the Orion database
- Next Generation Orion Mapping
- Centralized Upgrades
- New Scalability Engines Installer
- Orion Agent AIX
- TLS 1.2 Support for Legacy Tools
- UPS Monitoring
↧
VMAN 8 and later polling intervals
Just performed an upgrade to VMAN 8.1 or should I say VIM.....not sure?!?!
anyway...
We have eliminated the appliance and for some reason the statistics job didn't seem to be running after a couple days of no data support got some dev's on the line. They went into Database manager and found where the polling interval was set to 12 hours, no wonder it wasn't polling. There isn't anywhere to change this from the UI so here is the guts of it, to show what your polling times run the following query:
SELECT Caption, Name as [Job], a.PollingInterval, LastPoll FROM [dbo].[VIM_PollingTasks] as a
inner join [dbo].[VIM_PollingTaskTypes] as b on a.PollingTaskTypeID = b.PollingTaskTypeID
inner join [dbo].[Nodes] as c on a.NodeID = c.NodeID
This should return the Node Name, Job Name, Polling Interval(Where mine was set incorrectly), and the last time the job was finished.
After updating the polling interval to a more desirable value polling began
↧
↧
Stale NFS Test
↧
Orion AIX Agent for IBM Power Systems
No, you haven't entered a multidimensional time warp. Nor are you having a 90's flashback. While the industry hype cycle is primarily focused on hot new trends like hybrid IT, SaaS, and containers, there lurks an unsung hero in the darkest dwellings of many of today's most established organizations. It oftentimes doesn't get the attention or appreciation it deserves, because to most, its existence is completely transparent. It sits there in the corner, just plugging away, day after day, hour after countless hour, without complaint or need for recognition. Yet these systems remain at the very core of the business, handling the most critical transactions. From maintaining patients medical records, keeping all your banking transactions in order, to running some of today's largest companies CRM and ERP applications, AIX is still very much around us everyday, touching our lives in ways you probably haven't even considered.
For as important as these systems remain even today, the monitoring of their performance and application health is far too often overlooked or completely forgotten. Perhaps it's because these workhorses were built to last and seldom fail at their important duties, making them fall into the dangerous category of out-of-sight out-of-mind. More likely however, is that these systems have traditionally been extremely difficult to gain visibility into using modern day multi-vendor monitoring solutions. That may be because a long time ago, IBM seemingly stole a page out of Sony's playbook of market dominance, which had propelled their proprietary Betamax and MiniDisk formats into the iPhone like successes of their day. Oh, wait. That's not what happened! That's not what happened at all!!
Unfortunately, despite strict and very well defined industry standards which would govern how key operating system metrics should be exposed, and allowing third party monitoring solutions to provide necessary insight into their health and performance, IBM decided that standards didn't necessarily apply to them. This decision has historically made monitoring AIX systems challenging for both their customers, as well as, 3rd parties seeking to provide a monitoring solution for those organizations most critical systems. Compounding this problem is the fact that the few monitoring solutions available to those customers have traditionally been wildly complex, difficult to deploy and configure, and even more challenging to maintain. A new solution was needed. One which could bring with it unexpected simplicity, where none existed before. Its time has come, and that time is now.
AIX Agent Deployment
As one would expect from SolarWinds, deployment of the AIX agent is a simple turnkey affair, no different than deploying Agents to other operating systems, such as Windows or Linux. That's right, deploying an Agent to AIX is just as simple as it is for Windows and you don't need to be an expert in AIX. In fact, you don't even need any experience using AIX to be successful monitoring these systems with Server & Application Monitor (SAM) 6.6. If you can add a Node in Orion, then you, too, can monitor your AIX 7.1 and 7.2 systems.
Add Node Wizard - Push Deployment
To begin, navigate to [Settings -> All Settings -> Add Node], enter the IP address or fully qualified host name of the AIX host you'd like managed in the "Polling Hostname or IP Address" field and select the "Windows & Unix/Linux Servers: Agent" radio button from the available "Polling Method" options. Next, enter the credentials that will be used to both connect to the AIX host and install the agent software on the 'Unix/Linux tab. The credentials provided here should have 'root' or equivalent level permissions. Note that the credentials provided here are used only for initial deployment of the agent. Future password changes of the account credentials provided here will have no impact on the agent once it is deployed. Alternatively, if you authenticate to your AIX host via SSH using a client certificate rather than a username and password, click the 'Certificate Credential' radio button and upload your certificate in PEM format through the Orion web interface. This certificate will then be used to authenticate to the AIX host for the purpose of installing the Agent.
You can also optionally add SNMP credentials to the Agent if SNMP has already been configured properly on the AIX system. Rest assured, though, that this isn't needed and is used only if you're wanting to utilize SAM's SNMP Component Monitors against the AIX system. Configuring this option will also populate the 'Location' and 'Contact' fields located on the 'Node Details' resource if those values have been properly populated in your SNMP configuration. Everything else will be polled natively through the AIX Agent with zero reliance upon SNMP.

Once you've entered your AIX credentials, click the 'Next' button at the bottom of the page. The Agent will then be deployed to the AIX host using a combination of SSH and SFTP requiring TCP port 22 be open from the Orion server (or additional polling engine) to the AIX endpoint you wish to manage for push deployment to function properly.
| Install Agent Prompt | Install Agent Progress Indicator | List Resources |
|---|---|---|
 |  |  |
Manual - Pull Deployment
In some scenarios it may not be possible for the Orion server to push the agent to the AIX host over SSH. This is not uncommon when the host you wish to manage resides behind a NAT or access control lists restrict access to the AIX system via SSH from the network segment where the Orion server resides. While firewall policy changes, port forwarding, or one-to-one address translations could be made to facilitate push deployment of the agent, in many cases, it may be far easier to perform a manual deployment of the agent to those hosts.
The Agent package can be downloaded from the Orion web interface to the AIX host by going to [Settings -> All Settings -> Agent Settings -> Download Agent Software] and selecting "Unix/Linux" from the options provided and clicking "Next".
| Download Agent Software - Machine Type |
|---|
 |
| Download Agent Software - Deployment Method |
 |
In the following step of the Wizard select "Manual Install" and click "Next". Finally, in the third and final step of the wizard is where you will select 'IBM AIX 7.x' from the 'Distribution' drop down. Here you can also configure any advanced options the agent will use when it is installed, such as which polling engine the Agent should be associated with in Agent Initiated (Active) mode, or the listening port the Agent will use when running in Server Initiated (Passive) mode. Additionally, you can also specify a proxy server the Agent should use to communicate to the Orion server or Additional Polling Engine in Agent Initiated (Active) mode. If you're deploying in an environment where proxy servers are used, fret not. The Agent's proxy configuration fully supports the use of authenticated proxies.

After selecting all the appropriate configuration options, click the "Generate Command" button at the bottom of the page. This will generate a dynamic installation command based upon the the settings chosen above, which can then be copied and pasted into an SSH or X-Windows session on the AIX host. The AIX machine will then download and install the appropriate agent software from the Orion server using those pre-configured options.
| Copy Generated Agent Installation Command | Paste Command into SSH Terminal | Agent Installation Success |
|---|---|---|
 |  |  |
As soon as the Agent is registered with the Orion server, select your newly added agent node and click "Choose Resources" from the 'Manage Agents' view to select items on the node you would like to monitor.

Agent Advantages
So what's so great about Agents anyway? What's wrong with using the tried and true agentless methods for monitoring AIX hosts, like SNMP?
Encryption
Well, as anyone who has the misfortune of using SNMP to monitor their AIX hosts can tell you, it's not all sunshine and lollipops, starting with configuring SNMP. Most environments today have strict security standards which mandate the use of encryption for virtually all network communication. While configuring SNMP v1/v2 on AIX isn't especially difficult for an experienced AIX administrator, neither of those versions of SNMP utilize encryption. That would necessitate that users utilize SNMPv3, which comparatively speaking, practically requires users obtain a PHD from Big Blue University in AIX to properly enable and configure. By comparison, the Orion AIX Agent natively utilizes highly secure 2048 bit TLS encryption for all network communication.
Visability
IBM's proprietary SNMP daemon leaves much to be desired when compared to other standard based SNMP daemons running on alternative operating systems. Chief among the complaints I hear regularly is that IBM's SNMP daemon doesn't support important standard MIBs, such as the HOST-RESOURCES-MIB which exposes key pieces of information regarding running processes on the server and their respective resource consumption. This remains the primary reason why so many customers have chosen to replace IBM's proprietary SNMP daemon with NET-SNMP. SImilar to NET-SNMP, though, are issues of reflecting critical metrics accurately, such as memory utilization. It seems odd that something so basic would present so many challenges and be pervasive across both Linux and AIX when monitored via SNMP.
Reliability
Like all Agents in Orion, the AIX Agent runs independent of the Orion server. This means the Agent continues to monitor the host where it's installed, even if the Orion server is down, or otherwise inaccessible due to a network outage. Once connectivity is restored or the Orion server is brought back online, the data collected by the AIX agent is then uploaded to the Orion server, filling gaps in the historical time series charts that would have otherwise existed if that node was being monitored via SNMP. This ensures that availability reporting is accurate, even if the server running Orion experiences a catastrophic failure.
Reachability
In today's highly secure and heavily firewalled environments which are riddled with network obstacles such as network address translation, port address translation, access control lists, and proxies, it's sometimes amazing that anything works at all. More and more the things that need to be monitored are oftentimes the most difficult to monitor. With the AIX agent, overcoming these obstacles is a snap, allowing users to monitor their AIX systems regardless of where they might be located in the environment. Have your Orion system deployed in the Cloud and running in Amazon's AWS or Microsoft's Azure? Not a problem. Deploy the Agent in Agent Initiated (Active) Mode and forget about VPN tunnels or 1:1 NAT mappings. Does all traffic leaving the network go through a proxy server? No problem. The Agent natively supports the use of authenticated proxies to access the Orion server, while conversely, Agent communication within Orion can be configured to utilize a proxy server to reach an Agent that might not be accessible directly. These are possibilities you previously could only dream about when using SNMP.
AIX Agent Exclusive Features
There have been several Orion features released throughout the years which had previously only been available for nodes running other operating systems, such as Linux or Windows. AIX had largely been left out in the cold. That is, until today.
Network Interface Monitoring
In Server & Application Monitor 6.6, network interfaces on your AIX server can now be monitored without needing Network Performance Monitor installed. This functionality is available exclusively through the AIX Agent, and does not count against your SAM component monitor usage or NPM element license count, in the event you also have NPM installed. That means this functionality is provided essentially free and potentially even allows you to free up some of those valuable NPM element licenses for other nodes in your envionment.
Volume Performance Monitoring
Today, storage is the leading cause of server and application performance issues. Having visibility into storage volume performance, such as disk reads/writes per-second, and queued disk I/O from within the Orion web console alongside other key performance indicators, allows you to isolate where performance bottlenecks are occurring on your server and which applications are effected. With the AIX Agent, you now have visibility into the storage volume performance, similar to those that you've grown accustomed to on your Windows and Linux volumes.
| Total Disk IOPS | Disk Queue Length |
|---|---|
 |  |
Real-Time Process Explorer
When applications aren't running right, inevitably there's a culprit. It may be the processes that make up the application you're already monitoring, or it might be with those you aren't. The Real-Time process explorer provides you visibility into all processes and daemons running on your AIX server, along with with their respective resource utilization. It's like your web based command center where you can quickly determine which processes are running amuck. No more firing up your SSH client, logging in and running 'topas' to troubleshoot application issues. Now you can do it all from the comfort of your web browser. Spot a runaway process or one that's leaking memory like a sieve? You can also terminate those processes directly within that same web interface. Simply select the process(s) you want to 'kill' and click 'End Process'. Voila! It's just that easy.
You can also now select processes you wish to monitor on your AIX server directly through the Real-TIme Process Explorer. To do so, simply select the process you're interested in monitoring and click 'Start Monitoring'. You'll then be walked through SAM's application template wizard where you can choose to add this process to one of your existing Application Templates, or create a new one.

Reboot Management Action
If you find yourself in a situation where terminating processes alone does not resolve your application issue, there's always the tried and true reboot. While usually the option of absolute last resort, it's comforting to have it easily at hand when and if you've exhausted all other options. Simply click the 'Reboot' button in the 'Management' resource on the 'Node Details' view and you'll be prompted to confirm that you really mean business.

Application Component Monitors
Last, and unquestionably most important, are the wide array of various SAM Application Component Monitors supported by the AIX Agent. From these components you can create templates to monitor virtually any application, commercial, open source, or home grown.
| AIX Agent Supported SAM Component Monitor Types | |||
|---|---|---|---|
| HTTPS Monitor | |||
| DNS User Experience Monitor | |||
| File Age Monitor | |||
| File Change Monitor | HTTP Monitor | Nagios Script Monitor | |
| TCP Port Monitor | |||
↧
Welcome to Solarwinds...........
For many us starting out with Solarwinds, we are not sure where to start, what should I do, where do I go, and how do I do "Solarwinds". Trust me, I have been there and sometime when I work with a new product or have touched one in a while, I have to hunt for the information I need. Well, I have developed this page as a Starting Point for All Starting Points. The intentions is to provide general direction for those new to Solarwinds.
As I find more helpful posts for my use, I will reference them here. Please follow&bookmark this page, if this would be a helpful resource for you.
=-=-=-=-=-=-=-=-=-=-=-=-=-=-=-=-=-=-=-=-=-=-=-=-
=-=-=-=-=-=-=-=-=-=-=-=-=-=-=-=-=-=-=-=-=-=-=-=-
=-=-=-=-=-=-=-=-=-=-=-=-=-=-=-=-=-=-=-=-=-=-=-=-
For Beginners: New to Solarwinds and not sure where to start.
Contribution of the Year 2016: Monitoring 101 by adatole
=-=-=-=-=-=-=-=-=-=-=-=-=-=-=-=-=-=-=-=-=-=-=-=-
If you are new to Solarwinds and have not already done so here is the link for the on-boarding mission. This is a great tutorial on how to use the site and score yourself some excellent Thwack Points! This mission will take you about 15 minutes.
You Don't Know Thwack - Onboarding Mission
Getting Started with Evaluations for Solarwinds Orion Products
=-=-=-=-=-=-=-=-=-=-=-=-=-=-=-=-=-=-=-=-=-=-=-=-
This was submitted by ashley.heilbronn@lr.org on this thread Just starting as solarwinds admin and Im looking for some solarwinds best practices... HELP!. I liked it so much and thought it was a great starting point for new folks that I wanted to include it on the Welcome to Solarwinds........... . If you found this piece helpful please LIKE it and mark it as HELPFUL.
Here are some best practices I've learned for myself, i've looked after 2 solarwinds instances over the past 5 years, one was at a Refinery, Mine and Port where i was a network sys admin,it was just a one man show and my current gig .
- Create your own dashboard and views with some stuff that is relative to you? I've added the show last 25 audit logs as the 1st thing I see, I like to know who is access SW and where from (IP Address).
- Create a organize grouping structure for your nodes you are monitoring that works for your role, my company has a global presence about 190 offices or so, so my group nesting looks like this Company > Region > Country > City > Office > Office RTR > Office LAN
- Dynamic queries for groups, learn how to define dynamic queries to help automate the population of groups.
- Setup your dependency for your groups, like in my nesting above, if my RTR group goes down than than my LAN group is unreachable which tells the polling, hey back off on the polling on the LAN infrastructure, till it becomes reachable again, and reduce the load on the poller.
- Custom Properties, I've only just started using these bad boys and whole cow, these are very helpful in a lot ways, one such way is converting a inventory listing about our circuit providers for our office routers, which means i can build very flexible alerting schemes.
- If you have SAMs as apart of your build, deploy all the solarwinds application monitors to your monitoring environment, and monitor of every aspect of your build, IIS insight, SQL insight for database server, QoE Server sensors for solarwinds servers and database, vmware polling for database server and solarwinds server, EVERYTHING!!, it gives you very deep understanding how everything works with each other and you can mature with the appstack approach.
- don't be afraid to try new things is the most important thing, get a virtual environment setup with SW with virtual box and GNS3 on a machine with decent CPU and RAM and run wild with it.
- set up meetings with stakeholders and ask the question how can the monitoring/reporting help you?
=-=-=-=-=-=-=-=-=-=-=-=-=-=-=-=-=-=-=-=-=-=-=-=-
For Intermediates: Been around as a user/viewer but would like to know and do more.
Solarwinds Labs - One Stop Shop
SolarWinds Certified Professional Launch
=-=-=-=-=-=-=-=-=-=-=-=-=-=-=-=-=-=-=-=-=-=-=-=-
Hardware/Virtualware:
=-=-=-=-=-=-=-=-=-=-=-=-=-=-=-=-=-=-=-=-=-=-=-=-
Interesting Threads
INFRA-AS-CODE: How do we start? - Good Change Management Process
=-=-=-=-=-=-=-=-=-=-=-=-=-=-=-=-=-=-=-=-=-=-=-=-
If you are ready for some more fun stuff, try these out:
Everything DISA STIGs for your Network
=-=-=-=-=-=-=-=-=-=-=-=-=-=-=-=-=-=-=-=-=-=-=-=-
Top 10 Thwackers Content:
In the Presence of aLTeReGo..... by aLTeReGo
Learning and Understanding by mcbridea
Customizing your Solarwinds Orion - NPM by wluther
Network Configuration Manager - Configuration Change Templates and Things by goodzhere
=-=-=-=-=-=-=-=-=-=-=-=-=-=-=-=-=-=-=-=-=-=-=-=-
=-=-=-=-=-=-=-=-=-=-=-=-=-=-=-=-=-=-=-=-=-=-=-=-
=-=-=-=-=-=-=-=-=-=-=-=-=-=-=-=-=-=-=-=-=-=-=-=-
↧